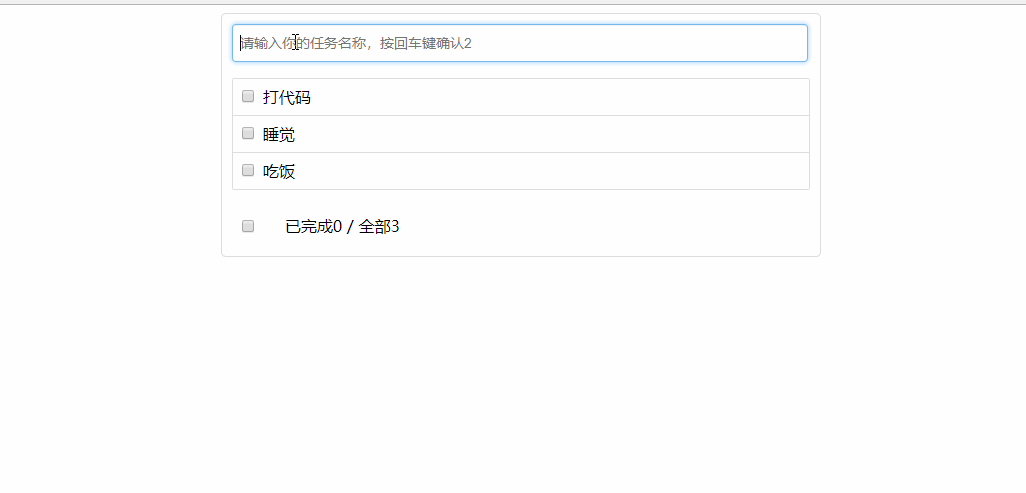
3.2. 组件的组合使用-TodoList
功能: 组件化实现此功能
1. 显示所有todo列表
2. 输入文本, 点击按钮显示到列表的首位, 并清除输入的文本
真没想到,这个例子居然对我来说这么难,从5月份停滞到现在8月份了,才有了一点感觉,敢看下去。很大部分原因还是得益于我最近一个星期看的redux项目,多多少少对react项目有了一些了解。
说实话,目前看来react项目确实很难(以后还有nextjs,前后端一起做,更难),很难就意味着会的人少一些,而国外项目很多都是react写的,我学会了不是更有竞争力吗?我现在一定要买车,我想涨个几千块钱的工资去买车,不买车不行了。
一直想在晚上或者周末的时候学习,但真的是学不进去,即使我是双休,今天想到了一个办法,我在手机上下载了B站,在上下班坐地铁的时候或者中午休息的时候可以试试看一看,反正坐地铁也是没有座位,每天看半小时(一周5天 * 0.5小时 * 56周 = 140小时,可以把数据结构与算法看好多遍了),碰到需要做笔记的地方,可以先手机截图,再写一些文字,然后晚上可以总结一下笔记。一个星期也可以学一些东西了。把react学完之后,就可以看韩老师的数据结构与算法了,很多东西其实我都忘记了,这可不行,得掌握核心科技。
3.1.4里面已经讲了,首先是拆分组件,这个todolist该怎么拆分呢?从vue的观点来看,这就是一整个组件,我写vue几年了,确实没有拆的这么细过,一个input也可以作为一个组件。但是react就是这样的,可以拆分的非常细。
按照3.1.4的步骤来做。
这里一个重要的知识点就是,props的更新会引起子组件的重新渲染,这一点想到了,做起来就容易了。
1、拆分组件
将todolist拆分为4个组件:header组件、list组件、item组件、footer组件。创建这些文件夹和空文件即可。

2、实现静态组件
可以自己实现一下,我就是这一步卡住了几个月的时间,怎么用react来实现?我以前还真的没有做过。其实我太担忧了,这一步不要想太多,就按照以前的知识,将组件写好,不用考虑实现任何交互,因为这一步就是静态页面,我就用class将这几个组件写好就够了,然后将这些组件组合起来,放在app.jsx里面,显示没有问题就行了。CSS可以大概写一下。
这里我直接使用老师提供的模板,在react全家桶资料\04_静态页面\todos_page里面,先将html代码全部放到app.js里面,将css代码全部放到app.css里面,然后将代码拆分到不同的组件里面,样式也带过去。静态显示没有问题就OK。
3、实现动态组件
3.1 动态显示初始化数据
这一步也很简单,通过分析,input组件里面的数据要添加到list里面去,但这两个组件是兄弟组件,现在还没有讲到兄弟组件的传值,只讲到了父组件传递数据到子组件,所以这一步先考虑将todos数据定义在app.jsx里面,传递给list组件,然后传递到item组件中。
3.2 交互
这一部分是最难的,因为涉及到子向父传值,之前没有遇到过。其实遇到过的,父组件可以向子组件传递数据,但也可以传递方法,那么子组件就可以通过调用这个方法,来达到传值给父组件的目的。
项目中涉及到给新添加的item赋id的值,不能是重复的,我想到了在app.jsx里面定义个变量,这个值一直增加即可。但是老师考虑到了实际项目的情况,所以推荐使用uuid库,
npm i uuid。但是这个库有点大,所以使用了另一个库:nanoid,npm i nanoid,直接引入使用即可。其实id的问题本不是前端应该考虑的,因为这个id应该是数据库里面的id,这里了解一下即可。
老师说的import引入文件的规范:
1、第三方的东西往上靠
2、自己的东西往下靠
3、样式放最后
具体代码就不展示出来了,只展示app.js里面的代码,如果不会就多做几遍,这个就是一个面试题。
xxxxxxxxxx1111import React, { Component } from "react";2import Header from "./components/Header";3import List from "./components/List";4import Footer from "./components/Footer";5import "./App.css";67export default class App extends Component {8 state = {9 todos: [10 {11 id: 1,12 name: "吃饭",13 completed: false,14 },15 {16 id: 2,17 name: "睡觉",18 completed: false,19 },20 {21 id: 3,22 name: "打牌",23 completed: false,24 },25 ],26 };2728 // 添加todo29 addTodo = (newTodo) => {30 const { todos } = this.state;31 let newTodos = [newTodo, todos];32 this.setState({33 todos: newTodos,34 });35 };3637 // 更新todo状态38 updateTodo = (id, completed) => {39 const { todos } = this.state;40 // 报错信息:Expected to return a value in arrow function array-callback-return,这个地方的写法要特别注意41 // const newTodos = todos.map((todo) => {42 // if (todo.id === id) {43 // todo = { ...todo, completed }44 // }45 // });4647 const newTodos = todos.map((todo) => {48 if (todo.id === id) {49 return { todo, completed };50 } else {51 return todo;52 }53 });54 this.setState({55 todos: newTodos,56 });57 };5859 // 删除一个todo60 deleteTodo = (id) => {61 const { todos } = this.state;62 /**63 * 这是我经常使用的写法,没有报错。但是老师的写法是这样的:const newTodos = todos.filter(todo => {64 * return todo.id !== id65 * })66 * 数组的方法,为什么有的时候写了return,而有的时候没有写return,这种情况要好好分析一下。67 *68 * 箭头函数的用法、或者说数组的各种方法,我还是要仔细看一下。69 *70 * */7172 const newTodos = todos.filter((todo) => todo.id !== id);73 this.setState({74 todos: newTodos,75 });76 };7778 // 全选、全不选79 selectAll = (flag) => {80 const { todos } = this.state;81 const newTodos = todos.map((item) => {82 return { item, completed: flag };83 });84 this.setState({85 todos: newTodos,86 });87 };8889 // 清除已完成任务90 clearCompletedAll = () => {91 const { todos } = this.state;92 const newTodos = todos.filter((item) => !item.completed);93 this.setState({94 todos: newTodos,95 });96 };9798 render() {99 const { todos } = this.state;100 return (101 <div className="todo-container">102 <div className="todo-wrap">103 {/* 注意父组件向子组件传递方法的用法,等号左边的是传递给子组件的属性,右边是属性值。子组件通过调用等号左边这个方法,就相当于调用了父组件的方法。*/}104 <Header addTodo={this.addTodo} />105 <List todos={todos} updateTodo={this.updateTodo} deleteTodo={this.deleteTodo} />106 <Footer todos={todos} clearCompletedAll={this.clearCompletedAll} selectAll={this.selectAll} />107 </div>108 </div>109 );110 }111}老师最后总结了一下:
1.拆分组件、实现静态组件,注意:className、style的写法 2.动态初始化列表,如何确定将数据放在哪个组件的state中? ——某个组件使用:放在其自身的state中 ——某些组件使用:放在他们共同的父组件state中(官方称此操作为:状态提升) 3.关于父子之间通信: 1.【父组件】给【子组件】传递数据:通过props传递 2.【子组件】给【父组件】传递数据:通过props传递,要求父提前给子传递一个函数 4.注意defaultChecked 和 checked的区别,类似的还有:defaultValue 和 value 5.状态在哪里,操作状态的方法就在哪里---------比如说todos定义在app.js里面,那么操作todos的方法就全部写在app.js里面。
第4章:React ajax
4.1. 理解
4.1.1. 前置说明
- React本身只关注于界面, 并不包含发送ajax请求的代码
- 前端应用需要通过ajax请求与后台进行交互(json数据)
- react应用中需要集成第三方ajax库(或自己封装)
4.1.2. 常用的ajax请求库
jQuery: 比较重, 如果需要另外引入不建议使用(这句话是什么意思?除了项目本身就是jQuery写的话,不要在别的项目里面使用jQuery)
axios: 轻量级, 建议使用
1)封装XmlHttpRequest对象的ajax
2)promise风格
3)可以用在浏览器端和node服务器端
4.2. axios
4.2.1. 文档
https://github.com/axios/axios
4.2.2. 相关API
老师从一个案例来讲解axios的使用方法:
先将 react全家桶资料\06_其他\测试代理服务器 用vscode打开,使用node server1.js打开服务器(不用担心第三方库,因为这个文件夹里面已经包含了,但是git已经忽略了node_modules文件夹,所以测试的时候还是需要从zip压缩包里面重新放入node_modules)。
新建一个react项目,安装axios:npm i axios,在app.js里面写入下面的代码:
xxxxxxxxxx291import React, { Component } from "react";2import axios from "axios";34export default class App extends Component {5 getStudentData = () => {6 axios.get("http://localhost:3000/students").then(7 (response) => {8 console.log("response", response);9 },10 (error) => {11 console.log("error", error);12 }13 );14 };15 getCarData = () => {16 axios.get("http://localhost:3000/cars").then(17 (response) => {},18 (error) => {}19 );20 };21 render() {22 return (23 <div>24 <button onClick={this.getStudentData}>点我获取学生数据</button>25 <button onClick={this.getCarData}>点我获取汽车数据</button>26 </div>27 );28 }29}点击按钮请求数据,显示如下:

返回的是404。
这是为什么呢?因为ajax请求具有同源策略,服务器是http://localhost:5000,而react请求是http://localhost:3000,是不同源的。react的请求可以发送过去,但是返回结果会被ajax请求拒绝。所以需要使用代理服务器。
下面只讲了如何在react项目中使用代理服务器,但是没有讲代理服务器的原理(为什么会起作用),以后有时间再看吧。
方法1:
只能配置一个统一的代理。
在react项目的package.json文件里面进行配置:
xxxxxxxxxx11 "proxy": "http://localhost:5000"返回结果:

说明:
- 优点:配置简单,前端请求资源时可以不加任何前缀。
- 缺点:不能配置多个代理。
- 工作方式:上述方式配置代理,当请求了3000不存在的资源时,那么该请求会转发给5000 (优先匹配前端资源)。
题外话:
axios请求资源并不是像我想象的那样会直接请求后端资源,而是根据请求的路径来查找,而同源策略的存在,说明肯定会查找到前端资源,比如这里的localhost:3000,就是前端项目的public文件夹所在的地址,如果在public找不到,才会进行请求转发。(前端项目都用到了webpack,所以这是webpack的规则)
方法2:
配置多个代理。另外开一个终端,输入node server2.js,让服务器2也运行起来。
需要在app.jsx同层级创建一个文件setupProxy.js,名字不能修改,里面必须写cjs,也就是Nodejs格式的代码,不能写es6格式的代码:
xxxxxxxxxx291const proxy = require("http-proxy-middleware")23/** 函数的参数app是哪来的?这个暴露出去的函数又被哪里使用了?怎么使用的?4* 不知道,应该是react脚手架帮助我们做了这些事情,app就是整个项目。5* 其实这里和方法1中一样,只需要配置即可,有时间再了解具体的原理。6*/7module.exports = function(app){8 app.use(9 // 这里的api1和api2是哪里来的???应该是自己规定的,方便我们对不同服务器的接口进行区分,那么在我们写接口方法的时候,在后端写好的接口路径本身加上前缀 /api1或者 /api2,然后代理会区分对待这些接口,进行不同的转发。10 11 // 遇见 /api1 前缀的请求,就会触发该代理配置12 proxy("/api1",{13 target:"http://localhost:5000",// 这个参数规定:请求转发给谁14 changeOrigin:true,// 控制服务器收到的请求头中Host的值,强烈推荐使用true,因为服务器其实会收到Host的值,如果服务器进行了一些限制,那么就会对请求产生影响。而改为true之后,就可以完美骗过服务器。15 /*16 changeOrigin设置为true时,服务器收到的请求头中的host为:localhost:500017 changeOrigin设置为false时,服务器收到的请求头中的host为:localhost:300018 changeOrigin默认值为false,但我们一般将changeOrigin值设为true19 */20 21 pathRewrite:{'^/api1':''} // 重写请求路径(必须),为什么要重写?因为在后端接口路径的基础上,我们在写请求方法的时候,会加上前缀 /api1 ,那么真实请求的肯定需要把这个 /api1 去掉才能请求到数据。22 }),23 proxy("/api2",{24 target:"http://localhost:5001",25 changeOrigin:true,26 pathRewrite:{"^/api2":""}27 })28 )29}上面应该是react@17的写法,我安装的是react@18,所以写法有一些改变:
xxxxxxxxxx161const { createProxyMiddleware } = require("http-proxy-middleware");23module.exports = function (app) {4 app.use(5 createProxyMiddleware("/api1", {6 target: "http://localhost:5000",7 changeOrigin: true,8 pathRewrite: { "^/api1": "" },9 }),10 createProxyMiddleware("/api2", {11 target: "http://localhost:5001",12 changeOrigin: true,13 pathRewrite: { "^/api2": "" },14 })15 );16};同时需要在app.js中将需要转发的接口地址进行修改:
xxxxxxxxxx361import React, { Component } from "react";2import axios from "axios";34export default class App extends Component {5 getStudentData = () => {6 7 // 注意:配置了setupProxy.js之后,请求发送的时候,端口号仍然是3000。8 // 为什么?因为你发送的请求要被转发为5000,你一开始就写成5000,怎么转发?肯定写本地的地址啊。9 axios.get("http://localhost:3000/api1/students").then(10 (response) => {11 console.log("response", response);12 },13 (error) => {14 console.log("error", error);15 }16 );17 };18 getCarData = () => {19 axios.get("http://localhost:3000/api2/cars").then(20 (response) => {21 console.log("response", response);22 },23 (error) => {24 console.log("error", error);25 }26 );27 };28 render() {29 return (30 <div>31 <button onClick={this.getStudentData}>点我获取学生数据</button>32 <button onClick={this.getCarData}>点我获取汽车数据</button>33 </div>34 );35 }36}点击按钮结果:

说明:
- 优点:可以配置多个代理,可以灵活的控制请求是否走代理。
- 缺点:配置繁琐,前端请求资源时必须加前缀。
GET请求
xxxxxxxxxx191axios.get('/user?ID=12345')2 .then(function (response) {3 console.log(response.data);4 })5 .catch(function (error) {6 console.log(error);7 });89axios.get('/user', {10 params: {11 ID: 1234512 }13 })14 .then(function (response) {15 console.log(response);16 })17 .catch(function (error) {18 console.log(error);19 });POST请求
xxxxxxxxxx101axios.post('/user', {2 firstName: 'Fred',3 lastName: 'Flintstone'4})5.then(function (response) {6console.log(response);7})8.catch(function (error) {9console.log(error);10});4.3. 案例—github用户搜索
4.3.1. 效果
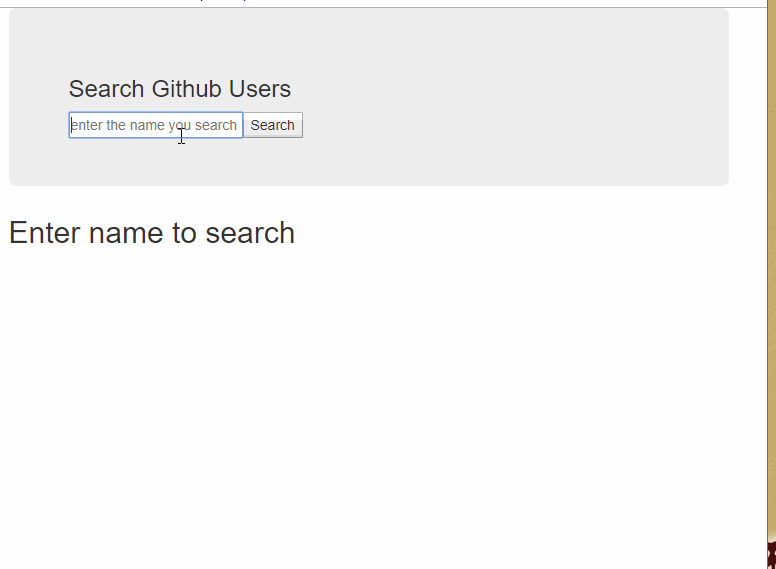
请求地址: https://api.github.com/search/users?q=xxxxxx
4.3.2实现
还是按照3.1.4的步骤来写:
还是一个重要的知识点,父组件传递给子组件的props如果更新了,那么就会引起子组件的重新渲染。
1、拆分组件
将组件拆分成Search和List组件。创建components文件夹,创建这两个组件。
2、实现静态组件
从 /react全家桶资料/04_静态页面/users_page 中拿到结构。先将html和css代码全部粘贴到App.js和App.css文件中(注意html的属性class要改为className,style的写法要改变等等),然后将 bootstrap.css 放到public文件夹中,新建一个css文件夹,放到其中,然后在index.html文件中引入bootstrap.css。
将App.js和App.css的代码进行拆分,静态显示没有问题就行了。
3、实现动态组件
3.1 动态显示初始化数据
安装axios,由于是search触发的请求,所以将请求写在Search组件里面。请求地址:https://api.github.com/search/users?q=xxxxxx。
xxxxxxxxxx521// Search.jsx23import React, { Component } from "react";4import axios from "axios";56export default class Search extends Component {7 handleSearch = () => {8 // 获取input框里面的搜索词9 // 解构赋值的连续写法,注意连续写法只能把最终结果获取到。比如说这里的value可以获取到,但是keywordElement是不能获取到的。10 // 注意解构赋值的连续写法就是 冒号右边用大括号括起来的变量。而解构赋值的重命名就是 冒号右边的一个变量。两者要区分。11 const {12 keywordElement: { value: keyword },13 } = this;1415 /**16 * 注意:这里直接使用了老师提供的github的api地址,并且没有使用代理配置,照样可以正常获取数据,这是为什么呢?17 * 照说本地是localhost:3000,而服务器地址是github,是不同源的,应该获取不到数据才对啊。18 * 原因是这个服务器使用了cors来解决了跨域问题,但是cors不推荐使用,因为使用了cors,就意味着所有人都有获取数据的权限了。19 */20 // axios21 // .get(`https://api.github.com/search/users?q=${keyword}`)22 // .then((response) => {23 // this.props.getData(response.data.items);24 // })25 // .catch((err) => {});2627 28 /** 老师提供了本地的服务器,在 /react全家桶资料/05_所需服务器/server 这里面,使用 node server.js 来启动即可。29 * 这个服务器提供了两个接口 /search/users 和 /search/users2 ,目的是当github的接口被封锁后,可以使用 /search/users2 这个接口,这个接口提供的是模拟数据。30 * 这个服务器是运行在 localhost:5000 上面的,所以需要进行代理配置。31 *32 */3334 axios35 .get(`http://localhost:3000/api1/search/users?q=${keyword}`)36 .then((res) => {37 this.props.getData(res.data.items);38 })39 .catch((err) => {});40 };41 render() {42 return (43 <section className="jumbotron">44 <h3 className="jumbotron-heading">搜索 Github 用户</h3>45 <div>46 <input ref={(c) => (this.keywordElement = c)} type="text" placeholder="请输入关键字搜索" />47 <button onClick={this.handleSearch}>搜索</button>48 </div>49 </section>50 );51 }52}因为Search和List是兄弟组件,所以暂时需要借助app.js来进行数据传递。
xxxxxxxxxx301// App.jsx23import React, { Component } from "react";4import Search from "./components/Search";5import List from "./components/List";6import "./App.css";78export default class App extends Component {9 // 初始化数据10 state = {11 users: [],12 };1314 // 获取用户信息15 getData = (users) => {16 this.setState({17 users,18 });19 };2021 render() {22 const { users } = this.state;23 return (24 <div className="container">25 <Search getData={this.getData} />26 <List users={users} />27 </div>28 );29 }30}然后List组件里面直接渲染即可。
xxxxxxxxxx191import React, { Component } from "react";23export default class List extends Component {4 render() {5 const { users } = this.props;6 return (7 <div className="row">8 {users.map((item) => (9 <div className="card" key={item.id}>10 <a href={item.html_url} target="_blank" rel="noreferrer">11 <img alt="avatar" src={item.avatar_url} style={{ width: "100px" }} />12 </a>13 <p className="card-text">{item.login}</p>14 </div>15 ))}16 </div>17 );18 }19}3.2 交互
交互就是获取数据,Search里面已经写了。
一个知识点:
解构赋值的连续写法和解构赋值的重命名
xxxxxxxxxx181let obj = {2a:{3b:14}5}67// 要求解构赋值b8// 传统解构赋值9const {a} = obj;10const {b} = a;1112// 连续解构赋值13const {a:{b}} = obj;14console.log(b);1516// 连续解构赋值+重命名17const {a:{b:value}} = obj;18console.log(value);
但只做到这里是不够的,一:数据请求时应该有Loading显示,二:数据请求之前,应该展示初始的界面。怎么做?
暂时的考虑是在app.js里面定义一些变量,在search请求数据时,更改这些变量,这些变量实时传递到List中,用来判断展示不同的信息。
那么怎么根据不同的参数render不同的界面呢?这里老师使用的是三元表达式,多个三元表达式一起写。
xxxxxxxxxx381// App.jsx23import React, { Component } from "react";4import Search from "./components/Search";5import List from "./components/List";6import "./App.css";78export default class App extends Component {9 // 初始化数据10 state = {11 users: [], // 存储获取的用户数据,初始化为空数组12 isFirst: true, // 是否为第一次打开页面13 isLoading: false, // 标识是否处于加载中14 err: "", // 存储请求相关的错误信息15 };1617 // 获取用户信息18 // getData = (users) => {19 // this.setState({20 // users,21 // });22 // };2324 // 获取数据的方法就不能像上面getData写的那么简单了,必须更新state中定义的多个变量。这个真的写的很巧妙,setState直接更新一个对象,要仔细领会。25 updateAppState = (stateObj) => {26 this.setState(stateObj);27 };2829 render() {30 return (31 <div className="container">32 <Search updateAppState={this.updateAppState} />33 <List {this.state} />34 </div>35 );36 }37}38xxxxxxxxxx631// Search.jsx,在数据请求时,更新了状态23import React, { Component } from "react";4import axios from "axios";56export default class Search extends Component {7 handleSearch = () => {8 // 获取input框里面的搜索词9 // 解构赋值的连续写法,注意连续写法只能把最终结果获取到。比如说这里的value可以获取到,但是keywordElement是不能获取到的。10 // 注意解构赋值的连续写法就是 冒号右边用大括号括起来的变量。而解构赋值的重命名就是 冒号右边的一个变量。两者要区分。11 const {12 keywordElement: { value: keyword },13 } = this;1415 // 发送请求前,通知App更新状态16 this.props.updateAppState({ isFirst: false, isLoading: true });1718 /**19 * 注意:这里直接使用了老师提供的github的api地址,并且没有使用代理配置,照样可以正常获取数据,这是为什么呢?20 * 照说本地是localhost:3000,而服务器地址是github,是不同源的,应该获取不到数据才对啊。21 * 原因是这个服务器使用了cors来解决了跨域问题,但是cors不推荐使用,因为使用了cors,就意味着所有人都有获取数据的权限了。22 */23 axios24 .get(`https://api.github.com/search/users?q=${keyword}`)25 .then((response) => {26 // 请求成功后,通知App更新状态27 this.props.updateAppState({ isLoading: false, users: response.data.items });28 })29 .catch((err) => {30 // 请求失败后,通知App更新状态31 this.props.updateAppState({ isLoading: false, err: err.message });32 });3334 /** 老师提供了本地的服务器,在 /react全家桶资料/05_所需服务器/server 这里面,使用 node server.js 来启动即可。35 * 这个服务器提供了两个接口 /search/users 和 /search/users2 ,目的是当github的接口被封锁后,可以使用 /search/users2 这个接口,这个接口提供的是模拟数据。36 * 这个服务器是运行在 localhost:5000 上面的,所以需要进行代理配置。37 *38 */3940 // axios41 // .get(`http://localhost:3000/api1/search/users?q=${keyword}`)42 // .then((res) => {43 // // 请求成功后,通知App更新状态44 // this.props.updateAppState({ isLoading: false, users: res.data.items });45 // })46 // .catch((err) => {47 // // 请求失败后,通知App更新状态48 // this.props.updateAppState({ isLoading: false, err: err.message });49 // });50 };51 render() {52 return (53 <section className="jumbotron">54 <h3 className="jumbotron-heading">搜索 Github 用户</h3>55 <div>56 <input ref={(c) => (this.keywordElement = c)} type="text" placeholder="请输入关键字搜索" />57 <button onClick={this.handleSearch}>搜索</button>58 </div>59 </section>60 );61 }62}63xxxxxxxxxx271// List.jsx23import React, { Component } from "react";45export default class List extends Component {6 render() {7 const { users,isFirst,isLoading,err } = this.props;8 // list表格要展示的东西:1、users,2、初次渲染的界面(此时还没有返回users),3、loading(请求数据时),4、error(请求错误时)。那么在展示时都需要考虑到。9 return (10 <div className="row">11 {12 isFirst ? <h2>欢迎使用,请输入关键字,然后点击搜索</h2> : 13 isLoading ? <h2>isLoading.........</h2> :14 err ? <h2 style={{color:"red"}}>{err}</h2> : 15 users.map((item) => (16 <div className="card" key={item.id}>17 <a href={item.html_url} target="_blank" rel="noreferrer">18 <img alt="avatar" src={item.avatar_url} style={{ width: "100px" }} />19 </a>20 <p className="card-text">{item.login}</p>21 </div>22 ))23 }24 </div>25 );26 }27}
4.4. 消息订阅-发布机制
消息订阅-发布机制有多种实现,但推荐使用工具库: PubSubJS。这个工具的使用非常简单,可以直接看npm里面的文档。
下载:
npm install pubsub-js --save使用:
1)
import PubSub from 'pubsub-js' //引入2)
PubSub.subscribe('delete', function(msg,data){ }); //订阅,msg是定义的消息名,data是别的组件发布的数据。3)
PubSub.publish('delete', data) //发布消息
那么就可以用pubsubjs来传递数据,重写github案例。那么App.jsx里面就不需要放任何状态和方法了,只放组件;Search和List直接进行通信,原来的状态其实都是List使用的,那么就放到List里面。
消息订阅的时机是什么?这一点很重要啊,就是List界面渲染的时候,也就是生命周期的componentDidMount(){}的时候。
消息发布的时机是什么?这个可以比较简单的想到,就是Search请求数据的时候。
这里还有一点非常重要,就是消息订阅是在
componentDidMount(){}的时候订阅的,但是消息发布之后,会触发state的更新,此时组件会重新渲染,componentDidMount(){}会再次执行吗?试一下。我的猜想是不会,因为此时走的是“更新时”的生命周期路线,setState触发的这条路线:

xxxxxxxxxx161// App.jsx 23import React, { Component } from "react";4import Search from "./components/Search";5import List from "./components/List";67export default class App extends Component {8 render() {9 return (10 <div className="container">11 <Search />12 <List />13 </div>14 );15 }16}xxxxxxxxxx451// Search.jsx23import React, { Component } from "react";4import PubSub from "pubsub-js";5import axios from "axios";67export default class Search extends Component {8 search = () => {9 const {10 keywordElement: { value: keyword },11 } = this;12 // 请求发起前,更新List里面的状态13 PubSub.publish("state", {14 isFirst: false,15 isLoading: true,16 });17 axios18 .get(`http://localhost:3000/api1/search/users?q=${keyword}`)19 .then((res) => {20 // 请求发起成功后,更新List里面的状态21 PubSub.publish("state", {22 isLoading: false,23 users: res.data.items,24 });25 })26 .catch((err) => {27 // 请求发起失败后,更新List里面的状态28 PubSub.publish("state", {29 isLoading: false,30 err: err.message,31 });32 });33 };34 render() {35 return (36 <section className="jumbotron">37 <h3 className="jumbotron-heading">搜索 Github 用户</h3>38 <div>39 <input type="text" ref={(c) => (this.keywordElement = c)} placeholder="输入关键词进行搜索" />40 <button onClick={this.search}>搜索</button>41 </div>42 </section>43 );44 }45}xxxxxxxxxx511// List.jsx23import React, { Component } from "react";4import PubSub from "pubsub-js";5import "./index.css";67export default class List extends Component {8 // 初始化数据9 state = {10 users: [], // 用户数据,初始化为空数组11 isFirst: true, // 是否是第一次渲染12 isLoading: false, // 是否正在请求数据13 err: "", // 数据获取失败的错误信息14 };1516 // 更新List状态,需要订阅消息来更新,订阅的时机是什么?界面渲染完成时17 componentDidMount() {18 this.token = PubSub.subscribe("state", (msg, data) => {19 this.setState(data);20 });21 }2223 // 组件销毁时需要取消订阅消息24 componentWillUnmount() {25 PubSub.unsubscribe(this.token);26 }2728 render() {29 const { users, isFirst, isLoading, err } = this.state;30 return (31 <div className="row">32 {isFirst ? (33 <h2>欢迎光临,请输入关键词进行搜索</h2>34 ) : isLoading ? (35 <h2>isLoading............</h2>36 ) : err ? (37 <h2>{err}</h2>38 ) : (39 users.map((item) => (40 <div className="card" key={item.id}>41 <a href={item.html_url} target="_blank" rel="noreferrer">42 <img alt="avatar" src={item.avatar_url} style={{ width: "100px" }} />43 </a>44 <p className="card-text">{item.login}</p>45 </div>46 ))47 )}48 </div>49 );50 }51}项目完善:在componentDidMount里面订阅了消息,那么组件销毁时应该取消消息订阅,那么就需要这样做:
xxxxxxxxxx101componentDidMount(){2 // 订阅消息时会返回一个token,就像setInterval会返回一个id一样,都是用于取消的。3 this.token = PubSub.subscribe("state",(msg,data) => {4 this.setState(data)5 })6},7componentWillUnmount(){8 // 在组件销毁前,取消订阅消息9 PubSub.unsubscribe(this.token);10}
4.5.1. 文档
说明:之前老师讲的jquery、axios都是基于xhr(XmlHttpRequest)技术实现的请求方法,fetch不是基于xhr,而是一个原生函数,可以直接使用,不用像axios那样安装、引入才能使用。
fetch的使用其实很简单,但是有一点需要特别注意:fetch的设计原则是“关注分离”,第一次请求回来的结果表示“是否联系服务器成功”,由于是Promise实现的,所以要将返回结果重新封装为一个Promise才能继续写下去。
我将github的案例中,fetch代替axios来实现数据请求。
xxxxxxxxxx501// Search.jsx 2// 链式Promise的写法34import React, { Component } from "react";5import PubSub from "pubsub-js";67export default class Search extends Component {8 search = () => {9 const {10 keywordElement: { value: keyword },11 } = this;12 // 请求发起前,更新List里面的状态13 PubSub.publish("state", {14 isFirst: false,15 isLoading: true,16 });17 fetch(`http://localhost:3000/api1/search/users?q=${keyword}`)18 .then((res) => {19 // 这一步只是提示服务器联系成功了,返回的数据其实是一个对象,真正后台返回的数据在res.json()中,需要做Promise的处理,便于链式的调用。20 return res.json();21 })22 .then((res) => {23 // 请求发起成功后,更新List里面的状态24 PubSub.publish("state", {25 isLoading: false,26 users: res.items,27 });28 })29 .catch((err) => {30 // 这里捕捉到的错误其实有两种:1、服务器联系不成功;2、数据请求返回失败,都会被捕捉。31 // 请求发起失败后,更新List里面的状态32 PubSub.publish("state", {33 isLoading: false,34 err: err.message,35 });36 });37 };38 render() {39 return (40 <section className="jumbotron">41 <h3 className="jumbotron-heading">搜索 Github 用户</h3>42 <div>43 <input type="text" ref={(c) => (this.keywordElement = c)} placeholder="输入关键词进行搜索" />44 <button onClick={this.search}>搜索</button>45 </div>46 </section>47 );48 }49}50xxxxxxxxxx481// Search.jsx 2// async-await的写法,这种写法相对于链式Promise的写法,好理解一些。34import React, { Component } from "react";5import PubSub from "pubsub-js";67export default class Search extends Component {8 search = async () => {9 const {10 keywordElement: { value: keyword },11 } = this;12 // 请求发起前,更新List里面的状态13 PubSub.publish("state", {14 isFirst: false,15 isLoading: true,16 });1718 // fetch的async await写法,注意捕捉错误的写法要用到try-catch19 try {20 let response = await fetch(`http://localhost:3000/api1/search/users?q=${keyword}`);21 // 因为response返回的结果还是一个Promise,所以还要用一次await来接收。22 let data = await response.json();23 // 请求发起成功后,更新List里面的状态24 PubSub.publish("state", {25 isLoading: false,26 users: data.items,27 });28 } catch (err) {29 // 捕获错误信息30 // 请求发起失败后,更新List里面的状态31 PubSub.publish("state", {32 isLoading: false,33 err: err.message,34 });35 }36 };37 render() {38 return (39 <section className="jumbotron">40 <h3 className="jumbotron-heading">搜索 Github 用户</h3>41 <div>42 <input type="text" ref={(c) => (this.keywordElement = c)} placeholder="输入关键词进行搜索" />43 <button onClick={this.search}>搜索</button>44 </div>45 </section>46 );47 }48}要想清楚理解fetch的用法,必须把Promise深刻理解。
4.5.2. 特点
- fetch: 原生函数,不再使用XmlHttpRequest对象提交ajax请求
- 老版本浏览器可能不支持
4.5.3. 相关API
GET请求
xxxxxxxxxx71fetch(url).then(function(response) {2 return response.json()3 }).then(function(data) {4 console.log(data)5 }).catch(function(e) {6 console.log(e)7 });POST请求
xxxxxxxxxx81fetch(url, {2 method: "POST",3 body: JSON.stringify(data),4 }).then(function(data) {5 console.log(data)6 }).catch(function(e) {7 console.log(e)8 })